[Retrospective posting again - It's actually February 2012]
Hmmm... Lead acid batteries... You gotta love 'em. Not.
12/12/2011
The new setup initially seemed fine, but I've noticed a nasty gassy smell when charging on sunny days. The block balancers are working fine and the two 12V halves of the banks are in balance, but there's some venting of gas under charge somewhere. Quite a lot of gas - as I had to open all the doors and windows to clear my nausea.
Not good behaviour for a set of "sealed" batteries.
With the Ritar batteries replacing the gel ones, I had increased the absorption charge Voltage to 2.375Vpc (14.25V / 28.50V at 25C with 4mV per degree C compensation). The Marathon bank is still attached and doesn't like to go up to much more than this but the Ritar blocks actually specify a higher Voltage of up to 2.433Vpc (14.60V at 25C). So it's unlikely that the Ritars are the problem.
14/12/2011
So I reduced the absorption charge Voltage down a bit to 14.20V and set the temperature compensation slope to stop at 17C. That way the compensated Voltage never goes above 14.40V. The absolute limit for the Marathons. Not normally a problem but lately it has been 16C in the mornings by the battery bank (the patio door double glazing isn't what it could be...).
Still no good. Maybe the Marathons can't handle higher than gel Voltage at all. So I threw the breaker on the Marathons and ran with the new Ritar battery bank only to see if that would isolate the problem (to the Marathons).
20/12/2011
No good. After a few days of charging and chopping and changing the Marathons around I discovered that it's one or both of the new Ritar batteries that are making the gas. They seem to be in balance electrically and deliver the power ok and charge ok but I'm getting poisoned while working downstairs!
I even resorted to ripping out the Marathons and sticking them in the garage outside to totally eliminate the possibility that they were gassing while idle in the room.
22/12/2011
So now I have had to swap over again. The new Ritars are definitely dodgy in some way. Even quite gentle charging above float level causes a degree of noxious behaviour.
The Ritars are now the ones outside in the garden and I brought the Marathons back in but discovered that one of the 6 packs is nearly dead. It doesn't accept charge very well at all. The fact that it was in parallel with all the others and they used active balancing had masked the fact that one of the packs was dead.
So now I'm down to just two pairs of the Marathons that are probably quite long in the tooth and my new batteries are pants...

Tuesday, December 27, 2011
Saturday, December 24, 2011
Have a VRLA Merry Christmas!
Ok, it wasn't the best pun in the world.
But for your Christmas entertainment, I present the dissection of a dead VRLA 7Ah battery :D
Been wondering what exactly the "Valve Regulated" bit of a Valve Regulated Lead Acid battery is? Wait no more...
Here's a dead battery I've been using as a door stop for a while...
 The lid is spot glued down so levering it off breaks these. It could be super-glued back down afterwards but this little guy is destined for the recycling centre so no worries there.
Under that "sealed for life" exterior we have the cell tops with their "valves"...
 Which turn out to be nothing more than rubber caps that are pressed on the cell tops with a bit of grease to make a gas tight seal. The cells have gone to vacuum a bit and you can see the rubber caps sucked in a bit. When I prised this fella off, it made a little hissing noise (but sucking air in, not blowing gas out).
 The top of the cell vent has some slots in it to allow gas out and above some random pressure below 6psi, the grease and rubber combo lets the gas out and then re-seals to stop air getting in (the oxygen would poison the cell). The gas can then escape along the shallow channels to the gaps in the lid (which, at first sight, looked to be just a gap for jamming my screwdriver into, in order to get this guy opened up... silly me :D ).
 In the final picture, you can see the top cover was pressing lightly on the rubber caps, to stop them popping off under pressure. You can also see where cells 2, 3, 4 and 6 had vented under overcharge and left some acid residue on the lid.
Well, I'm off to see the family, watch bad TV, and eat too much for a few days :D. See you on the other side!
But for your Christmas entertainment, I present the dissection of a dead VRLA 7Ah battery :D
Been wondering what exactly the "Valve Regulated" bit of a Valve Regulated Lead Acid battery is? Wait no more...
Here's a dead battery I've been using as a door stop for a while...
Under that "sealed for life" exterior we have the cell tops with their "valves"...
Well, I'm off to see the family, watch bad TV, and eat too much for a few days :D. See you on the other side!
Sunday, December 18, 2011
Un-FIT for Purpose
Another epic fail spotted today on our travels.
This was taken at 10.25 in the morning today... Where's the Sun in this picture, children?
 Yep, that's right... it's at right angles to the solar array that some PV company has talked these folks into installing on an almost west facing (250 degrees) roof with the promise of massive returns on investment in the rush to beat the FIT rate downgrade last week.
This array was installed back in early November, just after the announcement that the rates were being slashed to 21p per kWh.
The one thing that should be applauded from the "rent-a-roof" PV mob is that they never agree to install on a east-west roof because you just don't make the money on such an array...
Other companies are happy to take your cash and install wherever they can. The fact that it will take 20 years to pay back instead of 10 isn't their problem.
This was taken at 10.25 in the morning today... Where's the Sun in this picture, children?
This array was installed back in early November, just after the announcement that the rates were being slashed to 21p per kWh.
The one thing that should be applauded from the "rent-a-roof" PV mob is that they never agree to install on a east-west roof because you just don't make the money on such an array...
Other companies are happy to take your cash and install wherever they can. The fact that it will take 20 years to pay back instead of 10 isn't their problem.
Friday, December 16, 2011
Danger UXB - Uber-eXploding Battery!
The other day there was a funny smell in the living room... and come to think of it, I heard some unaccounted for popping noises.
Couldn't trace it - inspected the solar batteries and couldn't figure it out. Had to open the window and vent the smell.
Today I found the culprit... And it was an unlikely suspect... Some cheap Tronic Energy Eco 850mAh AAA NiMH cells I bought from Lidl a while ago to use in the multimeters on the wall. I'd put two of these cells on charge and one exploded in the charger! Well, the end cap had blown and leaked electrolyte all over the charger. The third cell that had been on charge at the same time (a Sony one) was fine.
I wondered if it was just the one duff cell, so I put three more in the charger and set it running. It finished in the usual time and the lights went out for each cell. I felt the cells and they didn't seem unusually warm. Huh... maybe it was just one duff cell after all.
But just as I was saying that to myself, all three cells erupted in a fizzing hissy fit! Nope, all of them are rubbish.

Can't be that they don't like fast charging, as Lidl also sells them in a pack with a fast charger.
At least my new cheap 180Ah solar batteries haven't exploded yet...
Couldn't trace it - inspected the solar batteries and couldn't figure it out. Had to open the window and vent the smell.
Today I found the culprit... And it was an unlikely suspect... Some cheap Tronic Energy Eco 850mAh AAA NiMH cells I bought from Lidl a while ago to use in the multimeters on the wall. I'd put two of these cells on charge and one exploded in the charger! Well, the end cap had blown and leaked electrolyte all over the charger. The third cell that had been on charge at the same time (a Sony one) was fine.
I wondered if it was just the one duff cell, so I put three more in the charger and set it running. It finished in the usual time and the lights went out for each cell. I felt the cells and they didn't seem unusually warm. Huh... maybe it was just one duff cell after all.
But just as I was saying that to myself, all three cells erupted in a fizzing hissy fit! Nope, all of them are rubbish.
Can't be that they don't like fast charging, as Lidl also sells them in a pack with a fast charger.
At least my new cheap 180Ah solar batteries haven't exploded yet...
Sunday, December 11, 2011
Bad Installs
As PV has been more about a "rush for gold" than producing useful energy, sometimes the allure of adverts and salesmen promising future returns of 10-15% in exchange for £10,000 of your hard earned cash today has lead to some questionable installs.
What's wrong with these installs, anybody?


Can't see the PV for the trees...
 This one doesn't look so bad...

 So when the trees aren't shading the array in the afternoon, the sewer vent is shading part of it all day. They've installed the worlds most expensive sun dial... At least the pipe will cast its shadow in the gap between the panels at 1pm (high solar noon in BST time) for the maximum power. It will just reduce power output from the panels left and right of it from dawn to 12.55 and from 13.05 to sunset.
What's wrong with these installs, anybody?
Can't see the PV for the trees...
But what's that on the roof in the middle of the array?
Friday, December 9, 2011
New Battery Time (Again)
Well, the Deka Solar gel batteries finally caved in. They've been in service daily since about October 2009 and they were second hand when I picked them up. After another 2 years and 1 month (some 760 charge cycles), they're way down on capacity and have gotten very high internal resistance but have more than met their expected life.
When pushed hard (say by the 2.2kW heater in the washing machine), they could still pump out 20-30 Amps with the other set of batteries but they took a long time to recharge, only managing to absorb 9 Amps of charge. The other bank will greedily suck up nearly 40 Amps, even through its deliberately under-sized long wiring.
I'd considered making a leap to lithium iron phosphate (LiFePO4) cells but having seen Jack Rickard nearly burn down his workshop on his electric vehicle web show - EVtv a couple of weeks ago, I was not certain that I'd have the charge control issues all figured out at the first go on big 400Ah cells. I may do a trial with some much smaller (cheaper if killed) 60Ah lithium cells with my spare Morningstar controller.
In the meantime, I found a good deal on some new 180Ah AGM deep cycle batteries from China by an outfit called Ritar. These guys usually make VRLA batteries for computer backup supplies (UPS). But these batteries are usually for "standby" use and not too amenable to being discharged daily. Although, the Marathon 105Ah packs are also UPS batteries and seem to still be going strong after 1 year and 5 months of daily cycling.

 Anyway, this big seller of used UPSs on eBay gets old UPSs and puts new batteries in them (not OEM batteries but these Ritar ones) and then sells the UPSs. But he had a side line in big deep cycle and EV batteries for toy electric cars and disabled mobility cars and so on. Ritar RA12-180D packs are slightly different from the RA12-180 packs (which are the UPS "standby" type, whereas the "D" type are supposed to be for "cyclic deep discharge" use). We'll see...
Very good price: £178 for 180Ah at the 10 hour rate (most makers quote the more inflated 20 or even 100 hour discharge rates - better makes quote the 10 hour or even 5 hour rate). Under £1 per Ah. And that included free next day TNT delivery on a pallet. I had to order two for my 24V system, and they turned up the next morning even though I ordered them at just after 4pm the previous day.
The batteries needed to be given an initial charge to wake them up from their months of storage in the warehouse and on the ship from China. Thankfully, AGM batteries do not self-discharge that much (2-3% per month). Even so, the Ritar technical guide recommended charging them for up to 24 hours before first use. So I set this up on a mains powered charger and monitored the Voltage and current until neither changed over time. One battery took the full 24 hours to reach this state; the other was a bit faster at about 18 hours (it read a higher initial Voltage when I first opened the box).
 Luckily, it was sunny for a couple of days and so I disconnected the defunct gel batteries and turned off the inverter to let the Marathons come up to something like full charge.
After the new Ritars had both been charged up, I connected them in where the gel battery bank had been and let the packs equalise overnight. I had to reprogramme the charge controllers a bit as the Ritars like higher Voltages than the gel ones did (although this conflicts a bit with the Marathons that also liked gel Voltages). I may have to disconnect the Marathons when I run periodic equalisation charges on the Ritars, as the Marathons start to vent gas above 14.40V charge and the Ritars want to go up to 14.60V on an equalisation charge.
 Yesterday was one of the windiest days in the UK for over 10 years and gloomy with it, but bright enough to gently charge the new combo and allow some tweaking of the charge controllers.
I mounted the active battery balancer on the distribution board to make things a bit neater. This can get a bit warm when working hard so I mounted it on stand-off washers; raising the heat sink off the wood. It will give a bit of extra air flow on the back of the device.
Today was the first use of the whole pack "in anger". It was wall to wall sunny and we used solar power to heat water (some 2.4kWh went into the water tank). We even managed to do a load of laundry with solar power again. The Ritar bank was more highly charged than the Marathons and it did more work initially. I'll have to see how they balance out over the next few days.
One interesting thing I've noticed is that the very low impedance of the Ritars has really cut down the "twittering" noise the inverter used to make. I always assumed that it was a "design feature" of the inverter but seems it was a feature of the gel batteries. Maybe if it starts up again as the Ritars get older, I'll plug my super capacitors into the circuit and see if that helps.
When pushed hard (say by the 2.2kW heater in the washing machine), they could still pump out 20-30 Amps with the other set of batteries but they took a long time to recharge, only managing to absorb 9 Amps of charge. The other bank will greedily suck up nearly 40 Amps, even through its deliberately under-sized long wiring.
I'd considered making a leap to lithium iron phosphate (LiFePO4) cells but having seen Jack Rickard nearly burn down his workshop on his electric vehicle web show - EVtv a couple of weeks ago, I was not certain that I'd have the charge control issues all figured out at the first go on big 400Ah cells. I may do a trial with some much smaller (cheaper if killed) 60Ah lithium cells with my spare Morningstar controller.
In the meantime, I found a good deal on some new 180Ah AGM deep cycle batteries from China by an outfit called Ritar. These guys usually make VRLA batteries for computer backup supplies (UPS). But these batteries are usually for "standby" use and not too amenable to being discharged daily. Although, the Marathon 105Ah packs are also UPS batteries and seem to still be going strong after 1 year and 5 months of daily cycling.
Very good price: £178 for 180Ah at the 10 hour rate (most makers quote the more inflated 20 or even 100 hour discharge rates - better makes quote the 10 hour or even 5 hour rate). Under £1 per Ah. And that included free next day TNT delivery on a pallet. I had to order two for my 24V system, and they turned up the next morning even though I ordered them at just after 4pm the previous day.
The batteries needed to be given an initial charge to wake them up from their months of storage in the warehouse and on the ship from China. Thankfully, AGM batteries do not self-discharge that much (2-3% per month). Even so, the Ritar technical guide recommended charging them for up to 24 hours before first use. So I set this up on a mains powered charger and monitored the Voltage and current until neither changed over time. One battery took the full 24 hours to reach this state; the other was a bit faster at about 18 hours (it read a higher initial Voltage when I first opened the box).
After the new Ritars had both been charged up, I connected them in where the gel battery bank had been and let the packs equalise overnight. I had to reprogramme the charge controllers a bit as the Ritars like higher Voltages than the gel ones did (although this conflicts a bit with the Marathons that also liked gel Voltages). I may have to disconnect the Marathons when I run periodic equalisation charges on the Ritars, as the Marathons start to vent gas above 14.40V charge and the Ritars want to go up to 14.60V on an equalisation charge.
I mounted the active battery balancer on the distribution board to make things a bit neater. This can get a bit warm when working hard so I mounted it on stand-off washers; raising the heat sink off the wood. It will give a bit of extra air flow on the back of the device.
Today was the first use of the whole pack "in anger". It was wall to wall sunny and we used solar power to heat water (some 2.4kWh went into the water tank). We even managed to do a load of laundry with solar power again. The Ritar bank was more highly charged than the Marathons and it did more work initially. I'll have to see how they balance out over the next few days.
One interesting thing I've noticed is that the very low impedance of the Ritars has really cut down the "twittering" noise the inverter used to make. I always assumed that it was a "design feature" of the inverter but seems it was a feature of the gel batteries. Maybe if it starts up again as the Ritars get older, I'll plug my super capacitors into the circuit and see if that helps.
Monday, November 7, 2011
New LED Energy Saving Lamp
The darkness... Tell me about it. Today was even darker
than yesterday.
An unbelievably tiny 390Wh generated by my whole solar array in the whole "day". The "sunset" at 4.35pm was eclipsed by "nuclear winter" at about 3.30 today, blacking out the Sun so much that the street lights came on early!
Lucky then that I've got a new LED lamp that consumes only 5W of energy.
 It's about as bright as a 8W CFL lamp (or a 40W tungsten lamp) but
starts up immediately at full brightness, lasts maybe 4x longer and
doesn't hum annoyingly in the plastic Ikea uplighter on my dining table.
It's about as bright as a 8W CFL lamp (or a 40W tungsten lamp) but
starts up immediately at full brightness, lasts maybe 4x longer and
doesn't hum annoyingly in the plastic Ikea uplighter on my dining table.
It's a Civilight GLS 5W type and has a wide even light, a frosted dome, and pleasant mid-warm-cool colour; not too blue and not too red white light.
 A bit dimmer than the 11W CFL it replaced, but I'd wanted a lower light, as it's over the TV.
At just under half the power consumption of the old CFL lamp, it will also extend the PV battery life... A jolly good thing in these dark days.

Best of all, my mate in the trade gave it to me for helping him out at some eco fairs over the last few weeks. He's on a evangelical crusade to get people to use LED lights instead of mercury containing CFLs.
An unbelievably tiny 390Wh generated by my whole solar array in the whole "day". The "sunset" at 4.35pm was eclipsed by "nuclear winter" at about 3.30 today, blacking out the Sun so much that the street lights came on early!
Lucky then that I've got a new LED lamp that consumes only 5W of energy.

It's a Civilight GLS 5W type and has a wide even light, a frosted dome, and pleasant mid-warm-cool colour; not too blue and not too red white light.
 A bit dimmer than the 11W CFL it replaced, but I'd wanted a lower light, as it's over the TV.
At just under half the power consumption of the old CFL lamp, it will also extend the PV battery life... A jolly good thing in these dark days.

Best of all, my mate in the trade gave it to me for helping him out at some eco fairs over the last few weeks. He's on a evangelical crusade to get people to use LED lights instead of mercury containing CFLs.
Sunday, November 6, 2011
Lummy, It's Dark!
As Victor Meldrew would say, "I don't beeleeve it!".
It's been so dark the last two days... I mean properly night time dark at mid-day.
839Wh generated yesterday.
Only a measly 712Wh today!
From a 2.5kWp PV array!!!
I've not had to turn the inverter off since maybe February, but today the battery bank crashed to just 26% and everything had to go back on the mains and the inverter was off - at lunchtime. Not even the night... Lunchtime!
My base load on PV is pretty high though. I put a clamp-on Current Cost meter (kindly donated by a friend) on the inverter output and all the network gear and DECT phones and bits and bobs around the house add up to about 80W continuous. Quite surprising really that the battery can run all of that for a couple of days. But the inverter has an idle power of 35W all on its lonesome, so that bumps the total DC load up to about 105W. That's 2.5kWh per day. And with only 1.55kWh charged in the last two days, and only 3.37kWh charged in the previous two days, it was just a question of time before the battery reached the end of its tether.
Didn't help the BBC 24 hour weather forecast being completely wrong for two days in a row, so I used too much battery power on Thursday and Friday on the promise of "sunny intervals" for Saturday and Sunday.
If things don't brighten up tomorrow, I may even have to break out the mains powered battery charger from the loft.
Saturday, November 5, 2011
Charles Hendry & Me Brill Idea
I met with Charles Hendry (the Minister of State for the Department of Energy) at an eco fair in Forest Row
(East Sussex) today.
He was delivering his bombshell - a snap FIT reduction for PV generation, arguing the point in a presentation that the FIT had to be reduced as demand has far outstripped cash supply (from the green tax levy on energy companies). If they did not shut the door hard, they would have had such a rush before April 2012 that the entire budget for the next 3 years for FITs would have been allocated by next April.
 Here he is, on the left, being verbally beaten up by an angry audience of commercial solar installers (one farmer had just canned a 40kW install, as it could not be done before the Dec12th FIT deadline) and assorted solar traders (notably Jeremy Leggett, founder of Solar Century, on the right). The dude in the middle was refereeing the bout.
They were all upset that they could not peddle a guaranteed 10-12% index linked and government backed investment opportunity (they're not selling PV, y'know - judging by the advertising copy that usually reads "MAKE FREE MONEY FOR 25 YEARS!!!").
After the debate officially ended, I talked briefly to the minister about alternatives. I suggested that the government should "do it's bit" in enabling me to "do my bit" by making all energy saving and generating equipment and services zero VAT rated. It's odd that my utility bills attract only 5% VAT but the LED lights I buy to save energy attract 20% VAT.
It's also odd that the more energy I use, the cheaper it gets. The first 900 kWhs are are 24p for me and then it drops to 10.5p. Should be the other way round, if we want to curb excessive use, no? It would also mean that the units I save first with my PV generated ones are the more expensive ones.
I also suggested the government extend the "invest as you earn" (IAYE) scheme that already exists (for buying bicycles to work and pension contributions, for example) to other eco products and services (say PV or ASHP or a new A rated boiler or windows or insulation...).
These IAYE investments are deducted by your employer through the PAYE model from your salary prior to income tax is calculated, making the buying of a bike or a pension (or PV or ASHP, etc) income tax free.
You don't get the cash. You get a voucher to buy the prescribed product or service. That way people can't scam the system to dodge tax and blow it on something else.
Think how much more you could invest in saving your skin (eco investment is about saving yourself) if you didn't have to pay 10-40% income tax and another 5-20% VAT for the pleasure.
Charles rubbed his chin and said "That's an intriguing idea...". He'll probably file it under "cranky ideas that reduce government revenue..." and black Mercedes "G cars" will be parked outside my house from now on. [sigh].
He was delivering his bombshell - a snap FIT reduction for PV generation, arguing the point in a presentation that the FIT had to be reduced as demand has far outstripped cash supply (from the green tax levy on energy companies). If they did not shut the door hard, they would have had such a rush before April 2012 that the entire budget for the next 3 years for FITs would have been allocated by next April.
They were all upset that they could not peddle a guaranteed 10-12% index linked and government backed investment opportunity (they're not selling PV, y'know - judging by the advertising copy that usually reads "MAKE FREE MONEY FOR 25 YEARS!!!").
After the debate officially ended, I talked briefly to the minister about alternatives. I suggested that the government should "do it's bit" in enabling me to "do my bit" by making all energy saving and generating equipment and services zero VAT rated. It's odd that my utility bills attract only 5% VAT but the LED lights I buy to save energy attract 20% VAT.
It's also odd that the more energy I use, the cheaper it gets. The first 900 kWhs are are 24p for me and then it drops to 10.5p. Should be the other way round, if we want to curb excessive use, no? It would also mean that the units I save first with my PV generated ones are the more expensive ones.
I also suggested the government extend the "invest as you earn" (IAYE) scheme that already exists (for buying bicycles to work and pension contributions, for example) to other eco products and services (say PV or ASHP or a new A rated boiler or windows or insulation...).
These IAYE investments are deducted by your employer through the PAYE model from your salary prior to income tax is calculated, making the buying of a bike or a pension (or PV or ASHP, etc) income tax free.
You don't get the cash. You get a voucher to buy the prescribed product or service. That way people can't scam the system to dodge tax and blow it on something else.
Think how much more you could invest in saving your skin (eco investment is about saving yourself) if you didn't have to pay 10-40% income tax and another 5-20% VAT for the pleasure.
Charles rubbed his chin and said "That's an intriguing idea...". He'll probably file it under "cranky ideas that reduce government revenue..." and black Mercedes "G cars" will be parked outside my house from now on. [sigh].
Tuesday, September 20, 2011
Micro Battery Off Grid System
Sorry for the lack of posts... No excuses, but I have been busy over the summer [Damn. That sounded like an excuse...]
Remember the Big Capacitors of a few posts ago? Well they've found a use :D
They're really cool, as it happens. I charged them up and left them with a Volt meter on them, to see how long they could hold a charge for. Kinda expected they would self discharge in a few minutes, if left alone.
Time ticked on, and they didn't seem to discharge (now that the LED Voltmeter was not connected to the tops). In fact, a couple of weeks later they had only discharged down to a few Volts less than when they were full! Extremely low leakage current. When I shorted them out by accident, they still packed a terminal blackening punch :D
I got a couple of big 230Wp panels to test from a friend, and got to wondering about how I could use them. I had a spare 1kW inverter and a spare MPPT charge controller. Having a big 500Ah battery bank on the main house, I wondered about the opposite. How small a battery could you use for an off grid system..?
Luck came in the form of a bargain bin at a DIY superstore. They were selling off loads of drill batteries for just £3 each. [rant mode ON] The cunning manufacturers change the drills and batteries to be slightly different each year so that your old batteries can't be used on their new drills... (built in obsolescence, again). It also mops up those pesky consumers who think that they can keep their old drill until it breaks... Oh, no. They change the shape of the new "spare" batteries so that they don't fit the old drills - forcing you to buy a whole new drill set. [rant mode OFF]
 Anyhoo... it means experimenters can pick up brand new 12V and 14.4V NiCd battery packs for less than the cost of a single cell at an electronics store. These cells are also rated for high current applications - A cordless hammer drill can pull 20A when working hard.
So, I had a pair of 12V drill batteries wired in series to make a titchy (for off grid use) 24V, 1.5Ah battery pack. But it can deliver 20A easy (480W). Good for a steady load but not enough to start something big, like a fridge or big TV... Enter the big capacitors!

 The capacitors can pack a punch of maybe a few hundred Amps for a second or two and the NiCd batteries can deliver 20 Amps for about four and a half minutes. NiCd cells are good in that very small ones can sustain high drain currents without their effective capacity being degraded. Small lead acid batteries would be useless, as firstly their capacity drops as you drain them faster and draining them until they are empty is a sure way to kill them. NiCd cells don't mind being drained flat - it's what happens when they're used in a drill.
So what I had was a 460W solar array with a 480W four minute "buffer". You can use this system to power quite big stuff on a sunny day without the bulk and expense of a big lead acid battery bank and it will keep your load going when small clouds pass in front of the array. It only takes about 15 minutes of charge for the battery to get to full from empty.
Some drill batteries (the ones designed for a fast charger) even come with a temperature sensor in the pack, so the drill charger won't over charge the pack and cook it. Unfortunately, the 12V packs I bought didn't, but the Morningstar MPPT-15 charge controller has one. I super-glued it to the top of one of the packs. This charge controller is also fully programmable. So, despite being primarily for lead acid batteries, it can easily be programmed to charge NiCd batteries. You just have to set the Voltages differently (a topping charge of 30V and then a float of 28.5V) and the timers much shorter (as the pack is so small). I programmed the temperature compensation to do nothing below 25 degrees C, but then start an aggressive negative slope above that. So, if the cells are heating up from high charge or discharge currents, the charge Voltage would be reduced. The charger itself is limited to 15 Amps charge current.
So far it's worked ok. I managed to run a 140W 28" LCD TV on it for a whole afternoon with only a couple of power failures (when it started to cloud over in the afternoon). The fully charged battery could run the set for about 12 minutes without direct sunlight on the array. The capacitors provide the oomph to start the inverter and the TV without the Voltage dropping. At the "float" Voltage of 28.5V, the two 1F capacitors store 28.52 x 0.5 Farads x 0.5 = 203 Joules of energy - or enough for 203W for 1s or 406W for 0.5s or 812W for 0.25s (although that would require draining the capacitor flat).
Huge battery banks are hugely expensive in off grid systems. This alternative method allows quite moderate loads to be run in good weather, during the day, with only a tiny cheap battery. If you planned it right, you could use the inverter in the day to do power hungry things, and then just use the NiCd battery pack at night to run ultra low power 12V DC LED lights... Or watch a very short TV show :D
Remember the Big Capacitors of a few posts ago? Well they've found a use :D
They're really cool, as it happens. I charged them up and left them with a Volt meter on them, to see how long they could hold a charge for. Kinda expected they would self discharge in a few minutes, if left alone.
Time ticked on, and they didn't seem to discharge (now that the LED Voltmeter was not connected to the tops). In fact, a couple of weeks later they had only discharged down to a few Volts less than when they were full! Extremely low leakage current. When I shorted them out by accident, they still packed a terminal blackening punch :D
I got a couple of big 230Wp panels to test from a friend, and got to wondering about how I could use them. I had a spare 1kW inverter and a spare MPPT charge controller. Having a big 500Ah battery bank on the main house, I wondered about the opposite. How small a battery could you use for an off grid system..?
Luck came in the form of a bargain bin at a DIY superstore. They were selling off loads of drill batteries for just £3 each. [rant mode ON] The cunning manufacturers change the drills and batteries to be slightly different each year so that your old batteries can't be used on their new drills... (built in obsolescence, again). It also mops up those pesky consumers who think that they can keep their old drill until it breaks... Oh, no. They change the shape of the new "spare" batteries so that they don't fit the old drills - forcing you to buy a whole new drill set. [rant mode OFF]
So, I had a pair of 12V drill batteries wired in series to make a titchy (for off grid use) 24V, 1.5Ah battery pack. But it can deliver 20A easy (480W). Good for a steady load but not enough to start something big, like a fridge or big TV... Enter the big capacitors!
So what I had was a 460W solar array with a 480W four minute "buffer". You can use this system to power quite big stuff on a sunny day without the bulk and expense of a big lead acid battery bank and it will keep your load going when small clouds pass in front of the array. It only takes about 15 minutes of charge for the battery to get to full from empty.
Some drill batteries (the ones designed for a fast charger) even come with a temperature sensor in the pack, so the drill charger won't over charge the pack and cook it. Unfortunately, the 12V packs I bought didn't, but the Morningstar MPPT-15 charge controller has one. I super-glued it to the top of one of the packs. This charge controller is also fully programmable. So, despite being primarily for lead acid batteries, it can easily be programmed to charge NiCd batteries. You just have to set the Voltages differently (a topping charge of 30V and then a float of 28.5V) and the timers much shorter (as the pack is so small). I programmed the temperature compensation to do nothing below 25 degrees C, but then start an aggressive negative slope above that. So, if the cells are heating up from high charge or discharge currents, the charge Voltage would be reduced. The charger itself is limited to 15 Amps charge current.
So far it's worked ok. I managed to run a 140W 28" LCD TV on it for a whole afternoon with only a couple of power failures (when it started to cloud over in the afternoon). The fully charged battery could run the set for about 12 minutes without direct sunlight on the array. The capacitors provide the oomph to start the inverter and the TV without the Voltage dropping. At the "float" Voltage of 28.5V, the two 1F capacitors store 28.52 x 0.5 Farads x 0.5 = 203 Joules of energy - or enough for 203W for 1s or 406W for 0.5s or 812W for 0.25s (although that would require draining the capacitor flat).
Huge battery banks are hugely expensive in off grid systems. This alternative method allows quite moderate loads to be run in good weather, during the day, with only a tiny cheap battery. If you planned it right, you could use the inverter in the day to do power hungry things, and then just use the NiCd battery pack at night to run ultra low power 12V DC LED lights... Or watch a very short TV show :D
Tuesday, July 19, 2011
The Big Build (Part 2)
Well, it's been one of those weeks...
With the to-ing and fro-ing from the sellers for wrong parts, it meant that the plan to get the project done this week rather went to pot.
But some progress was made, we got the tower up and started to figure out how to mount the rails.
My friends Peter and James helped massively here, with three brains being better than one and two pairs of hands on the roof being safer than one.
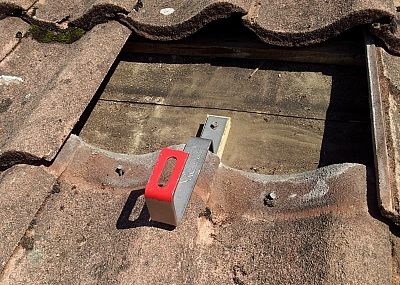
 The first problem was that the tiles were arranged so that the vertical wooden rafters were not in line with the troughs in the tile shapes but the peaks (at the edges of the tiles). You can see this in the picture below; the hooks are sitting in the join between tiles.
 This meant I needed to make up blocks to raise the hooks. I could have used hooks with lateral adjuster plates or made up wooden blocks between the rafters but this seemed the easiest bodge to do.
Conveniently, I had some treated roof batten wood that was almost exactly the right thickness. It wasn't quite square 25mm, so we could make some blocks with a thicker profile than others (to suit the particular wonkiness of the rafters) and make up the difference with thick galvanised washers as shims.
 Of course now the rafter screws that I'd ordered were a bit too short for comfort, so I had to buy longer ones.
 There are two pairs of rails for two rows of solar panels... Oh, yeah... The plan? To mount all the 80W panels from the patio and garage roof on two rows; one of 10 panels on top and 8 panels on the bottom. The lower row is fewer because there's a sewer pipe vent poking up though the roof.
I needed two lengths of rail for each row, as the rails are 3.2m long and I have about a 6.0m roof span (allowing some margin around the edge). The lengths are joined together with a U bar insert that bolts them together.
A special T bolt goes into the rail mounting channel and then bolts the rail to the hooks.
A good tip: Don't do this on a really sunny day as you'll burn your hands on the hot concrete tiles :D

 I used 12 hooks on the top row and 10 on the shorter bottom row. In the picture above, you can see I've bolted a sawn-off bit of rail to the top two hooks to use as a make-shift hand rail.
Once you get some hooks in the roof and bolt some rail to it, you can move about the roof much more safely, as you have something to stand on other than the tiles, and you can't slip off the roof without the rails stopping your slide.
Helps too to have a tower where the deck is at the exact height of the gutter so that you are effectively stepping on to the roof at "ground" height, rather than clambering up. I now have much less fear of the height. This can be a bad thing though, as fear can keep you alert.
In the sequence below, you can see us moving the tower back and forth and adding the rails from the bottom up, using the first "rung" to make it easy to then add the upper rows.
Finally, the panels just clamp on to the rails using special plate nuts that clip into the rail and can slide along it. Stainless steel hex bolts hold down the panels with end clamps that have to be the same height as the panel frame height. In-between the panels, a U shaped clamp holds adjacent panels to the rails.

 Note how the clamp on the left is taller than the one on the right because the panels have different frame heights. If I'd been planning ahead, I'd have bought panels with all the same frame height. :D


With the to-ing and fro-ing from the sellers for wrong parts, it meant that the plan to get the project done this week rather went to pot.
But some progress was made, we got the tower up and started to figure out how to mount the rails.
My friends Peter and James helped massively here, with three brains being better than one and two pairs of hands on the roof being safer than one.

Conveniently, I had some treated roof batten wood that was almost exactly the right thickness. It wasn't quite square 25mm, so we could make some blocks with a thicker profile than others (to suit the particular wonkiness of the rafters) and make up the difference with thick galvanised washers as shims.
I needed two lengths of rail for each row, as the rails are 3.2m long and I have about a 6.0m roof span (allowing some margin around the edge). The lengths are joined together with a U bar insert that bolts them together.
A special T bolt goes into the rail mounting channel and then bolts the rail to the hooks.
A good tip: Don't do this on a really sunny day as you'll burn your hands on the hot concrete tiles :D
 I used 12 hooks on the top row and 10 on the shorter bottom row. In the picture above, you can see I've bolted a sawn-off bit of rail to the top two hooks to use as a make-shift hand rail.
Once you get some hooks in the roof and bolt some rail to it, you can move about the roof much more safely, as you have something to stand on other than the tiles, and you can't slip off the roof without the rails stopping your slide.
Helps too to have a tower where the deck is at the exact height of the gutter so that you are effectively stepping on to the roof at "ground" height, rather than clambering up. I now have much less fear of the height. This can be a bad thing though, as fear can keep you alert.
In the sequence below, you can see us moving the tower back and forth and adding the rails from the bottom up, using the first "rung" to make it easy to then add the upper rows.
Finally, the panels just clamp on to the rails using special plate nuts that clip into the rail and can slide along it. Stainless steel hex bolts hold down the panels with end clamps that have to be the same height as the panel frame height. In-between the panels, a U shaped clamp holds adjacent panels to the rails.

You can see these end clamps and inter-panel clamps here:
The inter-panel clamps are universal because they don't actually extend down to the rail. They just grab the panels and then you torque the bolt so that it holds the panel tightly down. Don't go mad with the wrench or else you might crush the panel frame wall and crack the glass!! This is more of a risk on cheap panels that don't have strong frames.
Now, the eagle-eyed among you may have spotted that the two panels in the bottom left are not in line with the rest of the panels in that row. This is an annoying consequence of the old panels on the left having junction boxes that are too big! They stick out below the height of the frame and so when I came to mount them, the junction boxes fouled the rail... GRRRR. There was nothing for it but to mount those two panels lower on the rail, to clear the junction boxes. If I'd checked this before starting, I could have set the rails closer together...
Hiiiigh...Hooooo.... High ho, hi ho, it's off to bodge we go...
Friday, July 15, 2011
The Big Build (Part 1)
It was about time... About time I got these solar panels up on the roof, where they belonged.
So began two weeks of major bodgery on the house roof.
I'd started collecting materials for the project a few weeks ago. Proper solar cable - 50m of 6mmsq. MC4 plug sets from a Chinese maker called Lensun sold widely on eBay.
I'd also done some research into mounting kit. Peter, a friend from across town, had mounted some 100W and 185W panels using glavanised steel 41mm cable conduit and spring channel nuts.
I ordered some of the same rail but it was out of stock. They'd also stopped selling the right spring nuts to go in the channels so I ordered these from another company. The nuts turned up quickly enough but only half of them were galvanised! A call the supplier sorted this out and they sent me a whole load more at no extra charge.

After 5 days of waiting for the rails to turn up, the electrical supplier admitted they weren't stocking them any more. Useless. Now I had two loads of channel nuts for non-existent rails... Back to the drawing board.
Peter had recommended a PV installers supply shop on the web (www.solarseller.co.uk). They specialise in low cost aluminium rails and clamps and the roof brackets. Not as complicated an aluminium profile as some makes, but cheap and it does the job. The rails come in 3m lengths with U bar joiners to make longer rails. I ordered 8 rails to make the two rows of modules to go on the roof (one a bit shorter than the other as their is a sewer vent chimney sticking out of the roof at the bottom corner).
They also sold the matching Hilti stainless steel channel nuts for these rails.
 Unfortunately, this supplier also screwed up and sent me a box of wrong stainless steel bolts instead of the roof joist screws for the roof hooks, but a phone call had the right screws delivered the next day at no extra cost.
One thing that made this install more expensive was the fact that all my PV modules are different heights, ranging from 30mm to 50mm tall. This meant buying different sized end clamps to match and installing the modules in blocks that were the same height. Luckily, they sell "universal" in-between clamps that are shorter than 30mm deep to allow them to hold down any sized PV module.
Now all I needed was some scaffold or an access tower to get up to the roof... And a head for heights!
Renting scaffold turned out to cost a fortune (especially if you didn't know how long you would need it for). In theory, you'd only need it for a couple of days to do a solar install, but when did any of your DIY ever go to plan?
Then I found the answer... It was cheaper to buy an access tower than to rent one! These guys at www.laddersandscaffoldtowers.co.uk sell a well made DIY 7m tower kit that flat packs for storage. It came with big outrigger legs to keep the tower steady even when me and Peter were up at the top. In the end it was a good buy as I used it for over two weeks, making it break even compared to renting a tower. If I use it again, it will have saved me money.
So began two weeks of major bodgery on the house roof.
I'd started collecting materials for the project a few weeks ago. Proper solar cable - 50m of 6mmsq. MC4 plug sets from a Chinese maker called Lensun sold widely on eBay.
I'd also done some research into mounting kit. Peter, a friend from across town, had mounted some 100W and 185W panels using glavanised steel 41mm cable conduit and spring channel nuts.
I ordered some of the same rail but it was out of stock. They'd also stopped selling the right spring nuts to go in the channels so I ordered these from another company. The nuts turned up quickly enough but only half of them were galvanised! A call the supplier sorted this out and they sent me a whole load more at no extra charge.

After 5 days of waiting for the rails to turn up, the electrical supplier admitted they weren't stocking them any more. Useless. Now I had two loads of channel nuts for non-existent rails... Back to the drawing board.
Peter had recommended a PV installers supply shop on the web (www.solarseller.co.uk). They specialise in low cost aluminium rails and clamps and the roof brackets. Not as complicated an aluminium profile as some makes, but cheap and it does the job. The rails come in 3m lengths with U bar joiners to make longer rails. I ordered 8 rails to make the two rows of modules to go on the roof (one a bit shorter than the other as their is a sewer vent chimney sticking out of the roof at the bottom corner).
They also sold the matching Hilti stainless steel channel nuts for these rails.

One thing that made this install more expensive was the fact that all my PV modules are different heights, ranging from 30mm to 50mm tall. This meant buying different sized end clamps to match and installing the modules in blocks that were the same height. Luckily, they sell "universal" in-between clamps that are shorter than 30mm deep to allow them to hold down any sized PV module.
Now all I needed was some scaffold or an access tower to get up to the roof... And a head for heights!
Renting scaffold turned out to cost a fortune (especially if you didn't know how long you would need it for). In theory, you'd only need it for a couple of days to do a solar install, but when did any of your DIY ever go to plan?
Then I found the answer... It was cheaper to buy an access tower than to rent one! These guys at www.laddersandscaffoldtowers.co.uk sell a well made DIY 7m tower kit that flat packs for storage. It came with big outrigger legs to keep the tower steady even when me and Peter were up at the top. In the end it was a good buy as I used it for over two weeks, making it break even compared to renting a tower. If I use it again, it will have saved me money.
Wednesday, May 25, 2011
Measuring Dirt
A friend asked me if I could quantify the dirt on my solar panels from the previous post... o_O
I'd never tried to measure the effect of dirt before, but the conditions were right today to give it a go. Not completely scientific (I am a bodger after all), but here's what I did:
Firstly, there was the pair of panels from the pictures in the previous post. Now, they were very dirty, and I'd cleaned half of them to show the dirt. These modules are easy to measure, as they have a chocblock in the link between the pair. So, I crawled under them (taking the opportunity to clear out the weeds growing under them!), and inserted an Ammeter in the circuit.
I manually recorded some values for the current at 15 second intervals; before cleaning, whilst cleaning, and post cleaning. Obviously, while cleaning the things, I didn't actually record any data in my scrap of paper, so missing values are just the last known value repeated (to fill the gap - Excel wouldn't draw a line unless every cell had a number in it...). The modules were still wired into the array, and the battery was at bulk mode, so was drawing all the current it could.
Afterwards, I took a copy of the logger file that had the time and other solar system data (like the solar sensor data that tells you how strong the sun was as a percentage of the maximum it could be), and input the manual data against the same time records. A bit of fiddling in Excel chart maker and...
If you click on the graph, it will open up bigger.
 You can see that when I washed the pair of modules (half of which had been washed yesterday for the photos), the output current jumped up. The solar input power remained within 1% of flat the whole time, so it was definitely the effect of the dirt on the module that made the difference. I've noted on the chart where the modules were wet, and I dried them with a cloth, and then you can see the panels output drop off a bit, as they warm up again in the sun. PV cell power drops off a bit, as they get hot. I used warm water to wash them, so as to prevent any thermal shock to the glass, and not cool them down too much.
Then I thought, that seeing as I'd got all set up for washing these panels, I might as well do some of the others too. The trace below shows the power output of the TriStar array controller while I cleaned most of the panels attached to it. This time, I just let the modules dry in the sun.
I excluded the power figures from the SunSaver array, as those panels are completely separate, and I didn't clean them. I also ran out of water before being able to clean the bunch of panels at the front of the garage. In truth, I couldn't be bothered to do them, and I was supposed to be doing some work anyway :D.
Again, you can see a marked improvement in output from not having a load of grunge on the array...

I'd never tried to measure the effect of dirt before, but the conditions were right today to give it a go. Not completely scientific (I am a bodger after all), but here's what I did:
Firstly, there was the pair of panels from the pictures in the previous post. Now, they were very dirty, and I'd cleaned half of them to show the dirt. These modules are easy to measure, as they have a chocblock in the link between the pair. So, I crawled under them (taking the opportunity to clear out the weeds growing under them!), and inserted an Ammeter in the circuit.
I manually recorded some values for the current at 15 second intervals; before cleaning, whilst cleaning, and post cleaning. Obviously, while cleaning the things, I didn't actually record any data in my scrap of paper, so missing values are just the last known value repeated (to fill the gap - Excel wouldn't draw a line unless every cell had a number in it...). The modules were still wired into the array, and the battery was at bulk mode, so was drawing all the current it could.
Afterwards, I took a copy of the logger file that had the time and other solar system data (like the solar sensor data that tells you how strong the sun was as a percentage of the maximum it could be), and input the manual data against the same time records. A bit of fiddling in Excel chart maker and...
If you click on the graph, it will open up bigger.

Then I thought, that seeing as I'd got all set up for washing these panels, I might as well do some of the others too. The trace below shows the power output of the TriStar array controller while I cleaned most of the panels attached to it. This time, I just let the modules dry in the sun.
I excluded the power figures from the SunSaver array, as those panels are completely separate, and I didn't clean them. I also ran out of water before being able to clean the bunch of panels at the front of the garage. In truth, I couldn't be bothered to do them, and I was supposed to be doing some work anyway :D.
Again, you can see a marked improvement in output from not having a load of grunge on the array...

Tuesday, May 24, 2011
Muddy Solar Panels
One problem that solar panels face in such long dry spells of weather as we're having now is the accumulation of dust, pollen and other bird grunge on their surface.
It doesn't help that we've had some very light rain over the last day that has, in itself, contained a lot of mud.
This can degrade the output of the array until a really good downpour washes the panels, or you get a telescopic window cleaner out...
Before:
 After:

It doesn't help that we've had some very light rain over the last day that has, in itself, contained a lot of mud.
This can degrade the output of the array until a really good downpour washes the panels, or you get a telescopic window cleaner out...
Before:


Monday, May 23, 2011
Some Fav Quotes by Thomas Edison
"To invent, you need a good imagination and a pile of junk."
Amen to that. Bodgineering is at the heart of invention. Once you've bodged something together from bits of this and that, you can see how to do it "properly".
"We are like tenant farmers chopping down the fence around our house for fuel when we should be using Nature's inexhaustible sources of energy; sun, wind, and tide.... I'd put my money on the sun and solar energy. What a source of power! I hope we don't have to wait until oil and coal run out before we tackle that."
That was his hope in 1903. He'd be shocked that we're still "working on it" over 100 years later...
"Hell, there are no rules here - we're trying to accomplish something."
OFGEM, take note.
Thursday, May 19, 2011
1 MWh on the Clock
A bit of a milestone today. Since fitting the "proper" OFGEM generation meter back in March last year, the AC power generated (consumed) from my solar panels has been ticking up.
Today, it passed the 1000 kWh (1 MWh) mark. But amazingly, a full 153kWh of that total was generated just last month! May is shaping up pretty well too, having made 114kWh this May, compared to only 92kWh last May.
Today, it passed the 1000 kWh (1 MWh) mark. But amazingly, a full 153kWh of that total was generated just last month! May is shaping up pretty well too, having made 114kWh this May, compared to only 92kWh last May.
Wednesday, May 11, 2011
Big Capacitors!
Get a load of these babies!
 Giant 1 Farad capacitors. Used originally on super loud car audio systems.
I found them at a car boot sale, going for a tenner for the pair. They'd cost about £30 each when new.
They have these so called protection circuits on the top. I thought that it was an anti-surge device for when they have power applied. They have extremely low internal resistance (maybe as low as 0.002 Ohms) so can draw a huge surge current when connected to a source of current. But no, the circuit turned out to be just a buzzer that sounds when they are reverse connected by accident, or when subjected to over-Voltage. They have a quite small maximum working Voltage of 16V. Given the near explosion that occurred when I over-charged the baby capacitor on the bike generator, these would pose quite a risk, if mal-treated.
 The display reads Volts and the two other LEDs are really just for show (they're for car audio "enthusiasts" after all)... Although, they do serve a useful purpose as discharge loads, to make the capacitors safe in a short time after the power is removed.
Luckily, the tops just unbolt, and you can remove the circuit board. It's just held on the capacitor terminals with press contacts. Then the bolts can screw back into the terminals directly.
 The Voltmeter circuits are possibly useful later for something. On their own, they're worth £5 each, so the capacitors were actually "free".
 I thought that as I had a pair, I could wire them in series to allow them to be charged from one of the left-over small amorphous solar panels. Wiring them in series increases the Voltage they can handle, but reduces the capacitance, so you get a 0.5F capacitor that is safe up to 32V. If you wire them in parallel, you get a 16V 2F capacitor, and mind bending amounts of current (the internal resistance is halved again to 0.001 Ohms, giving a short circuit current of up to 16,000 Amps!).
The panel puts out about 23V, open circuit, in the sun, but you can't use that Voltage, as the current is so low. But you can charge a 0.5F capacitor from that current, over a minute or so. The capacitor, unlike a battery, does not seek to limit the Voltage it charges to. So, eventually, it will store a unit of energy at the highest Voltage attached to it, and can later deliver that energy with massive current.
I disconnected the charge source, and started measuring the Voltage across the capacitors, thinking the charge would leak away in a few minutes. To my surprise, only about 10% of the energy had leaked away after 24 hours! The energy level of a capacitor is exactly proportional to the Voltage it reads, unlike batteries that can read 12V, but be completely flat.
But what use are giant capacitors..? I'll let you know when I think of something :D They're just cool toys right now. A bit dangerous though. I shorted the wires of the pair when charging it from the small solar panel, and the entire lug at the end of one wire completely disappeared in a green flash of copper vapour discharge light.

I found them at a car boot sale, going for a tenner for the pair. They'd cost about £30 each when new.
They have these so called protection circuits on the top. I thought that it was an anti-surge device for when they have power applied. They have extremely low internal resistance (maybe as low as 0.002 Ohms) so can draw a huge surge current when connected to a source of current. But no, the circuit turned out to be just a buzzer that sounds when they are reverse connected by accident, or when subjected to over-Voltage. They have a quite small maximum working Voltage of 16V. Given the near explosion that occurred when I over-charged the baby capacitor on the bike generator, these would pose quite a risk, if mal-treated.

Luckily, the tops just unbolt, and you can remove the circuit board. It's just held on the capacitor terminals with press contacts. Then the bolts can screw back into the terminals directly.


The panel puts out about 23V, open circuit, in the sun, but you can't use that Voltage, as the current is so low. But you can charge a 0.5F capacitor from that current, over a minute or so. The capacitor, unlike a battery, does not seek to limit the Voltage it charges to. So, eventually, it will store a unit of energy at the highest Voltage attached to it, and can later deliver that energy with massive current.
I disconnected the charge source, and started measuring the Voltage across the capacitors, thinking the charge would leak away in a few minutes. To my surprise, only about 10% of the energy had leaked away after 24 hours! The energy level of a capacitor is exactly proportional to the Voltage it reads, unlike batteries that can read 12V, but be completely flat.
But what use are giant capacitors..? I'll let you know when I think of something :D They're just cool toys right now. A bit dangerous though. I shorted the wires of the pair when charging it from the small solar panel, and the entire lug at the end of one wire completely disappeared in a green flash of copper vapour discharge light.
Monday, May 2, 2011
Recycling Grey Water for the Garden
The other thing the Met Office said about April was that it was also the driest April for many years, with some parts of the UK receiving only 2mm of rain.
Despite having bought a second water butt for the garden last year to collect rain water, it still wasn't enough this month.
We've previously filled the water butt using saved bath water, but it was a troublesome process, and the cheap drill powered pump I had wasn't very good. In short, it was a... pain in the butt :D.
With more dry weather forecast, it was time to do some bodging...
First of all, you have to collect your grey water. This is water that isn't full of bits (mud, rocks, etc) or full of chemicals or organic matter. So water from the kitchen is no good (contains fats and food bits and so on). Washing machine water can be ok, but often has too much soap, fabric conditioner or even bleach in it. Used bath water is fine. Just don't use any bubble bath, bath salt, or go mad with the shower gel and shampoo or conditioner. The plants don't mind a little bit of soap.
Then you need to catch all the hair and bits of fluff in the water, as the pump won't like it (even with an inlet filter) and you don't want to clog the water butt or hoses either.
The missus had this handy tool, just for the job.
 Dunno if you can get them here, as she bought this one at a 100 Yen shop in Japan, where they are very common bathroom accessories. You can easily make one with a coat hanger and a bit of old net curtain though.
Incidentally, in Japan, it's actually quite common to recycle bath water into the washing machine for the wash cycle, as the soap powder will suspend the dirt in the water anyway. Clean water is only needed for the rinse cycle.
Next, you need a water pump. I'd been looking around for something better than the drill pump (a water pump you attach to a cordless electric drill). I found this new one by the garden hose makers, Hozelock.
 It's designed to be used in a water butt to power hose pipes and sprinklers and so on. It also says you can use it for emptying small paddling pools, and recycling bath water. It seems to retail for £70, but with a bit of shopping around, I managed to pick it up for £52.
 Water is sucked up from the bottom of the unit through a removable foam in-let filter that catches medium sized (1mm) particles and hair. In the screw-on hose adaptor at the top, it has a finer mesh outlet filter to catch particles as small as maybe 0.2mm in size. You need to use the fine filter if you're using the company's miniature irrigation system that drip feeds plants, or a hose fitting that has small spray holes that could get clogged. If you're using ordinary hose pipe fittings then you can take the fine filter out to get more flow.
The water in our water butt has bits in it anyway, and is only used with a watering can tap or jet hose, so I took the fine filter out.

I rigged up the hose outside, cable tying it to some big electrical cable clips I hammered into the wall. I then used a bit of string to hang the coiled up end loop outside the bathroom window, for when we're not using the hose.
The other end is just coiled up under one of the solar panels at the base of the wall.
When we need to pump water, I just un-roll the bottom end and stick it in the water butt, securing the pipe with a brick... useful things bricks. :D
Then I pull up the other end (using the string from inside), un-roll, and plug it into the pump, which sits in the bath. The pump uses normal Hozelock click-fit connectors, so you can use any normal hose.
The pump is designed to be completely or partially submerged, with the 10m water proof rubber cable going off to the mains remotely.
Make sure you use a RCD breaker on the socket! Don't sit in the bath (or pool) while using the pump, just in case... O_o
 Then it's just a case of remotely turning the power on. It draws about 300W, so I ran it from the solar power in the computer room.
The pump proved to be very efficient, quiet and fast. It emptied the bath of about 100 litres of water in 2-3 minutes, and it had enough pressure (1.1 bar / 16 psi) to ensure that the old hose, that has some kinks in it, opened up and worked beautifully.

The only thing that was a bit annoying was that the pump has a small hole on the side of the body, which sprays a jet of water out sideways, while working. This is normal as it's a "vent" to allow air to escape from the pump (part of its self-priming function). That's ok, when it's in a water butt, but it splashed water around the top of the bath tub when the water level got below the height of the hole. Some fettling may be required... A small cowl, or summat, to tame the (quite violent) jet that squirts out.
The pump has 2mm high "feet", and this allows it to suck up water right to the last couple of millimetres of water in the tub, especially if you position it over the bath plug. Very good. They make another pump which is intended for clearing floods, but it can't work in less than about 75mm of water... No good for draining a bath tub!
This water butt pump doesn't have an automatic float cut-off, so you need to watch it, and turn it off as soon as the water has run out, as running the pump dry will damage it. Ideally, you should turn it off just as it is about to start "gurgling" at the bottom of the bath.
If using it in a water butt, they recommend standing the pump on a couple of bricks at the bottom of the tank, so that it is clear of the worst of the sediment that collects at the bottom.
Given that we have grey water available every day, and the pump only cost a few Pounds more than buying yet another 150 litre water butt, it seemed good value. And we get the most out of our metered water.
Despite having bought a second water butt for the garden last year to collect rain water, it still wasn't enough this month.
We've previously filled the water butt using saved bath water, but it was a troublesome process, and the cheap drill powered pump I had wasn't very good. In short, it was a... pain in the butt :D.
With more dry weather forecast, it was time to do some bodging...
First of all, you have to collect your grey water. This is water that isn't full of bits (mud, rocks, etc) or full of chemicals or organic matter. So water from the kitchen is no good (contains fats and food bits and so on). Washing machine water can be ok, but often has too much soap, fabric conditioner or even bleach in it. Used bath water is fine. Just don't use any bubble bath, bath salt, or go mad with the shower gel and shampoo or conditioner. The plants don't mind a little bit of soap.
Then you need to catch all the hair and bits of fluff in the water, as the pump won't like it (even with an inlet filter) and you don't want to clog the water butt or hoses either.
The missus had this handy tool, just for the job.

Incidentally, in Japan, it's actually quite common to recycle bath water into the washing machine for the wash cycle, as the soap powder will suspend the dirt in the water anyway. Clean water is only needed for the rinse cycle.
Next, you need a water pump. I'd been looking around for something better than the drill pump (a water pump you attach to a cordless electric drill). I found this new one by the garden hose makers, Hozelock.


The water in our water butt has bits in it anyway, and is only used with a watering can tap or jet hose, so I took the fine filter out.

I rigged up the hose outside, cable tying it to some big electrical cable clips I hammered into the wall. I then used a bit of string to hang the coiled up end loop outside the bathroom window, for when we're not using the hose.
The other end is just coiled up under one of the solar panels at the base of the wall.
When we need to pump water, I just un-roll the bottom end and stick it in the water butt, securing the pipe with a brick... useful things bricks. :D
Then I pull up the other end (using the string from inside), un-roll, and plug it into the pump, which sits in the bath. The pump uses normal Hozelock click-fit connectors, so you can use any normal hose.
The pump is designed to be completely or partially submerged, with the 10m water proof rubber cable going off to the mains remotely.
Make sure you use a RCD breaker on the socket! Don't sit in the bath (or pool) while using the pump, just in case... O_o

The pump proved to be very efficient, quiet and fast. It emptied the bath of about 100 litres of water in 2-3 minutes, and it had enough pressure (1.1 bar / 16 psi) to ensure that the old hose, that has some kinks in it, opened up and worked beautifully.

The only thing that was a bit annoying was that the pump has a small hole on the side of the body, which sprays a jet of water out sideways, while working. This is normal as it's a "vent" to allow air to escape from the pump (part of its self-priming function). That's ok, when it's in a water butt, but it splashed water around the top of the bath tub when the water level got below the height of the hole. Some fettling may be required... A small cowl, or summat, to tame the (quite violent) jet that squirts out.
The pump has 2mm high "feet", and this allows it to suck up water right to the last couple of millimetres of water in the tub, especially if you position it over the bath plug. Very good. They make another pump which is intended for clearing floods, but it can't work in less than about 75mm of water... No good for draining a bath tub!
This water butt pump doesn't have an automatic float cut-off, so you need to watch it, and turn it off as soon as the water has run out, as running the pump dry will damage it. Ideally, you should turn it off just as it is about to start "gurgling" at the bottom of the bath.
If using it in a water butt, they recommend standing the pump on a couple of bricks at the bottom of the tank, so that it is clear of the worst of the sediment that collects at the bottom.
Given that we have grey water available every day, and the pump only cost a few Pounds more than buying yet another 150 litre water butt, it seemed good value. And we get the most out of our metered water.
Sunday, May 1, 2011
April 2011 - The Warmest (Sunniest) on Record?
The Met Office were reporting yesterday that this April may have been the warmest and driest in the UK on record. Judging by the record amount of electricity I harvested, it may also have been the sunniest.
Now this time last year I'd admit that I had less PV installed. The last lot of BP panels were installed in May and I had about 1.50kWp installed in total. But the fact that I have just over 2kWp installed this April doesn't account for the power harvest being 2.9 times higher than the previous year.
 The upshot has been that my solar system has offset just over 53% of my total electricity demand for the month, and up to 66% of weekly demand in the best week of the month (the last week). On a daily basis, the best day was the 28th, with over 85% of electrical demand served by solar power.
Quite astonishing, given that I didn't install the upgraded capacity from the recent haul of solar panels until the middle of he month.
The newly upgraded immersion heater controller is also maybe having an impact, as it can more effectively use the spare power available in the system.
Now this time last year I'd admit that I had less PV installed. The last lot of BP panels were installed in May and I had about 1.50kWp installed in total. But the fact that I have just over 2kWp installed this April doesn't account for the power harvest being 2.9 times higher than the previous year.

Quite astonishing, given that I didn't install the upgraded capacity from the recent haul of solar panels until the middle of he month.
The newly upgraded immersion heater controller is also maybe having an impact, as it can more effectively use the spare power available in the system.
Subscribe to:
Comments (Atom)