Fuelly

Tuesday, July 19, 2011

The Big Build (Part 2)

Well, it's been one of those weeks...

With the to-ing and fro-ing from the sellers for wrong parts, it meant that the plan to get the project done this week rather went to pot.

But some progress was made, we got the tower up and started to figure out how to mount the rails.

My friends Peter and James helped massively here, with three brains being better than one and two pairs of hands on the roof being safer than one.
The first problem was that the tiles were arranged so that the vertical wooden rafters were not in line with the troughs in the tile shapes but the peaks (at the edges of the tiles).  You can see this in the picture below; the hooks are sitting in the join between tiles.
This meant I needed to make up blocks to raise the hooks.  I could have used hooks with lateral adjuster plates or made up wooden blocks between the rafters but this seemed the easiest bodge to do.

Conveniently, I had some treated roof batten wood that was almost exactly the right thickness.  It wasn't quite square 25mm, so we could make some blocks with a thicker profile than others (to suit the particular wonkiness of the rafters) and make up the difference with thick galvanised washers as shims.
Of course now the rafter screws that I'd ordered were a bit too short for comfort, so I had to buy longer ones.
There are two pairs of rails for two rows of solar panels...  Oh, yeah... The plan?  To mount all the 80W panels from the patio and garage roof on two rows; one of 10 panels on top and 8 panels on the bottom.  The lower row is fewer because there's a sewer pipe vent poking up though the roof.

I needed two lengths of rail for each row, as the rails are 3.2m long and I have about a 6.0m roof span (allowing some margin around the edge).  The lengths are joined together with a U bar insert that bolts them together.

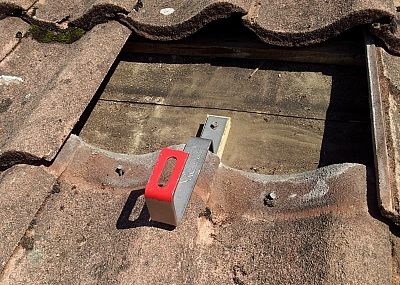
A special T bolt goes into the rail mounting channel and then bolts the rail to the hooks.

A good tip:  Don't do this on a really sunny day as you'll burn your hands on the hot concrete tiles :D
I used 12 hooks on the top row and 10 on the shorter bottom row.  In the picture above, you can see I've bolted a sawn-off bit of rail to the top two hooks to use as a make-shift hand rail.

Once you get some hooks in the roof and bolt some rail to it, you can move about the roof much more safely, as you have something to stand on other than the tiles, and you can't slip off the roof without the rails stopping your slide.

Helps too to have a tower where the deck is at the exact height of the gutter so that you are effectively stepping on to the roof at "ground" height, rather than clambering up.  I now have much less fear of the height.  This can be a bad thing though, as fear can keep you alert.

In the sequence below, you can see us moving the tower back and forth and adding the rails from the bottom up, using the first "rung" to make it easy to then add the upper rows.

Finally, the panels just clamp on to the rails using special plate nuts that clip into the rail and can slide along it.  Stainless steel hex bolts hold down the panels with end clamps that have to be the same height as the panel frame height.  In-between the panels, a U shaped clamp holds adjacent panels to the rails.
You can see these end clamps and inter-panel clamps here:
Note how the clamp on the left is taller than the one on the right because the panels have different frame heights.  If I'd been planning ahead, I'd have bought panels with all the same frame height. :D
The inter-panel clamps are universal because they don't actually extend down to the rail.  They just grab the panels and then you torque the bolt so that it holds the panel tightly down.  Don't go mad with the wrench or else you might crush the panel frame wall and crack the glass!!  This is more of a risk on cheap panels that don't have strong frames.
Now, the eagle-eyed among you may have spotted that the two panels in the bottom left are not in line with the rest of the panels in that row.  This is an annoying consequence of the old panels on the left having junction boxes that are too big!  They stick out below the height of the frame and so when I came to mount them, the junction boxes fouled the rail... GRRRR.  There was nothing for it but to mount those two panels lower on the rail, to clear the junction boxes.  If I'd checked this before starting, I could have set the rails closer together... 

Hiiiigh...Hooooo.... High ho, hi ho, it's off to bodge we go...

Friday, July 15, 2011

The Big Build (Part 1)

It was about time...  About time I got these solar panels up on the roof, where they belonged.

So began two weeks of major bodgery on the house roof.

I'd started collecting materials for the project a few weeks ago.  Proper solar cable - 50m of 6mmsq.  MC4 plug sets from a Chinese maker called Lensun sold widely on eBay.

I'd also done some research into mounting kit.  Peter, a friend from across town, had mounted some 100W and 185W panels using glavanised steel 41mm cable conduit and spring channel nuts.

I ordered some of the same rail but it was out of stock.  They'd also stopped selling the right spring nuts to go in the channels so I ordered these from another company.  The nuts turned up quickly enough but only half of them were galvanised!  A call the supplier sorted this out and they sent me a whole load more at no extra charge.

After 5 days of waiting for the rails to turn up, the electrical supplier admitted they weren't stocking them any more.  Useless.  Now I had two loads of channel nuts for non-existent rails... Back to the drawing board.

Peter had recommended a PV installers supply shop on the web (www.solarseller.co.uk).  They specialise in low cost aluminium rails and clamps and the roof brackets.  Not as complicated an aluminium profile as some makes, but cheap and it does the job.  The rails come in 3m lengths with U bar joiners to make longer rails.  I ordered 8 rails to make the two rows of modules to go on the roof (one a bit shorter than the other as their is a sewer vent chimney sticking out of the roof at the bottom corner).

They also sold the matching Hilti stainless steel channel nuts for these rails. 
Unfortunately, this supplier also screwed up and sent me a box of wrong stainless steel bolts instead of the roof joist screws for the roof hooks, but a phone call had the right screws delivered the next day at no extra cost.

One thing that made this install more expensive was the fact that all my PV modules are different heights, ranging from 30mm to 50mm tall.  This meant buying different sized end clamps to match and installing the modules in blocks that were the same height.  Luckily, they sell "universal" in-between clamps that are shorter than 30mm deep to allow them to hold down any sized PV module.

Now all I needed was some scaffold or an access tower to get up to the roof...  And a head for heights!

Renting scaffold turned out to cost a fortune (especially if you didn't know how long you would need it for).  In theory, you'd only need it for a couple of days to do a solar install, but when did any of your DIY ever go to plan?

Then I found the answer... It was cheaper to buy an access tower than to rent one!  These guys at www.laddersandscaffoldtowers.co.uk sell a well made DIY 7m tower kit that flat packs for storage.  It came with big outrigger legs to keep the tower steady even when me and Peter were up at the top.  In the end it was a good buy as I used it for over two weeks, making it break even compared to renting a tower.  If I use it again, it will have saved me money.