Fuelly
Showing posts with label Load Control. Show all posts

Sunday, February 26, 2012

CellLog8s "One-Shot" LVD

With little prospect of the firmware being fully fixed, I decided to implement a work around to make the CellLog8s at least work as a "one shot" Low Voltage Disconnect (LVD) for the inverter.

The problem was that without proper hysteresis in the CellLog8s firmware, the alarm output would flip-flop in an unstable way near the alarm set point value.  So I had to devise a way to iron out this transition behaviour and make it trigger once only.

I found a little DPDT latching relay in Maplins that does the trick, but I had to rebuild the interface board that I'd made previously.  In the video you can see the new circuit.


In this new version, the inverter receives an "Enable" signal from the interface.  This just connects to the common pin on the Remote/Off/On select switch on the inverter front panel.  The new relay is stable in both positions of its double throw output and has two coils, one to select each output mode.  It only needs a single short pulse to cause the state change and then further pulses have no effect (as you have to energise the opposite coil to change the state).

So, you press a button to "Enable" the inverter (or reset it, if it had tripped).  This just flips the relay "on".
The 680 Ohm resistors in series are because the relay has 12V coils with a measured DC resistance of about 700 Ohms.  They weren't quite equal though and (by luck more than judgement) I happened to pick the coils in such a way that the alarm state coil is the "stronger" one, so that when the alarm state is "true", the "reset" button does not work... Useful that.  You can't force the inverter to start up when something is wrong.

The second pole on the relay is just used for the LED indicator.

The output of the CellLog8s alarm port (now set to Normally Open) sits and does nothing until the set point is reached, at which point it will trigger.  The alarm port goes to closed state and triggers the "Disable" coil on the relay.  The LED goes out and the inverter is forced to shut down.  It cannot restart until the alarm condition has cleared and the reset button is pressed on the CellLog8s interface (and of course after you've investigated why it tripped!).

As programmed in the CellLog8s now, either a pack LVD or a cell imbalance alarm can cause it.

Next, all I had to do was hack the inverter to accept the Enable signal...
Here's another video of me "hacking" the inverter to get at the switch on the front panel and wiring in the connection to the new interface.  A bit of testing, too.
Now the battery is fully protected from any low Voltage drain from the inverter (the main load).

The advantage the new system has is that the relay consumes no power to hold the inverter in the enabled state.  Just a pulse of current from the reset button and then nothing.

In the alarm state, the other coil consumes 20mA for as long as the alarm is triggered. In practice, the load from the inverter is usually such that the pack or cell Voltage sags to the limit and triggers the alarm.  Instantly, the load is disconnected and the pack/cell Voltage recovers enough to rise above the alarm set point, which cancels the alarm.  Now the relay consumes no power again but is latched in the "Off" state.

In theory, the charge controllers, the SmartGauge, and even the CellLog8s itself could cause the pack to drain down and be damaged. But as I've set the cut-off Voltages quite high (24.0V pack and 3.00V per cell), it would probably take several days with no solar charge (the PV disconnect breaker thrown) to drain the last few Ampere.hours from the pack and damage it.

Wednesday, February 15, 2012

Still Testing the CellLog8s

After the previous experiments with the CellLog8s alarm output, I posted a query on the RC Groups forum where the manufacturer provides support for the range of Junsi chargers and cell monitors.

They looked at my video and blog entry and suggested that the problem might have been a grounding problem in my wiring of the LED to the alarm port.  The alarm port negative needs to be referenced to the cell negative.

So here's my update on the situation.  I wired the LED +ve into the cell +ve terminal.  The negative of the LED goes to the +ve alarm port and the -ve alarm port goes to the cell -ve terminal.  The chargers are all connected to the same points too.
You can see the LED and its connection points in the photo above.

In the photo below you can see the problem.
 The alarm was set to trigger when the pack Voltage exceeded 3.65V.  It's now 3.95V as shown on the charger and the logger display is showing 3.973V, alternating with the alarm status "over".  But at the same time, it's not beeping an alarm and the LED connected to the normally closed alarm output is ON (indicating no alarm condition).

Here's today's video showing the erratic behaviour of the alarm port and beeper.

Monday, February 13, 2012

Flakey CellLog8s alarm

Today's episode:
Still charging up the cells one at a time...

When no.4 got to be full, I decided to play with the CellLog8s and its alarm output.  I'd noticed that when it gets to (and beyond) the set point of the over Voltage alarm, it would flash "over" on the display but not always beep.  It goes though random phases of beeping every 4 seconds (like it should) and then not beeping for a while.

So I set it up with the provided alarm output cable (with a tiny plug and tiny thin wires...) to a 12V LED.  This  has the current limiting built in for use as a panel lamp in cars. You can see the alarm port on the device and the external LED circled in green in the photo.
The plan is that the CellLog8s will be my low Voltage monitor, both for the pack as a whole and individual cells (as any cell that goes below 2.0V will be permanently damaged).

The 3kW inverter is my only load and has a LVD cut-off built in, but there are two problems with this.  The first is that it has a fixed cut-off Voltage of 21.0V, which is too low.  It's 2.62V per cell.  For high drain applications (0.5C / 200A discharge) 2.8V is the recommended cut-off.  For lower currents, the cut-off Voltage is actually higher.  The cell can be considered "empty" when it gets to 3.0V.  This means that for the many hours of a day where the inverter is drawing a mere 3-4A while doing not a lot, the worst case applies and I need to shut the thing down when it gets to 24.0V pack Voltage.

Then it's also possible for the pack to be out of balance and one cell get below 3.0V before the others as the pack nears "empty".  If I accurately bottom balance the cells, this shouldn't happen but I want to catch it if it does.

The CellLog8s does both of these things.  It monitors each cell Voltage, and it monitors the pack Voltage.  And the alarm output can be triggered at any programmable level.

Now, back to the test...  Because I'm charging the cells, I set the over Voltage alarm to 3.65V so that as the cell gets near to the end, it would alarm so that I could watch it finish and shut the charger down.  Just to see the alarm work.

Ideally, the alarm output would trigger and latch.  That way, if the threshold is crossed, the load will be disabled and then require manual reset before it could be enabled again.

Anyway, for the test, I had the alarm set to "Normally Closed" output.  This means that the LED comes ON when there is NO alarm condition.  This would mean the CellLog8 has power (to drive the output transistor) and the wiring is working.  This would provide a fail-safe "inhibit" signal to the inverter remote port.  When there is no alarm, it's safe for the load to run.

When the alarm is triggered (by low Voltage), the LED should turn OFF.  This would signal to the inverter that there was either a low Voltage alarm or that there was a fault in the CellLog8 (open circuit wiring or no power to the device).  In either event, the inverter should be disabled or shut down.

Well, as you can see in the video, it sort of worked.  The alarm was triggered at the appointed Voltage and the LCD display started flashing "Over" to tell me what kind of alarm it was.  The CellLog8 started beeping (as it should) and the LED turned off.  But... It then came back on and randomly turned on and off.

At first I thought it was a hysteresis problem (with the alarm threshold being crossed multiple times as the Voltage crept up) but with the cell well over the limit, the LED continued to randomly turn on and off.  No good.

Time to post a bug report on the RC Groups forum where the manufacturer hangs out.  They've been quite good at listening and producing bug fixes and new features for the device firmware but this is a pretty basic problem that should have been ironed out by now.

Failing that, I could work around the problem with an externally latching switch / relay, but if the software on the logger worked properly in the first place, it would reduce the interface complexity and so the number of points of failure.

Wednesday, April 27, 2011

Dual Power Immersion Heater

The automatic load controller for my immersion heater has been working pretty well.  It turns on and off with the varying power of the Sun.  But it left something to be desired when the battery was starting the absorb cycle.

The battery consumed quite a lot of power, but not all of it.  The immersion heater needed 650W to run, so couldn't.  The result was a period of under utilised solar power in the late mornings, with a trace that looks like this:

Click to view bigger
By modifying the step down transformer supply for the heater, I created a dual power heater.  I step down the AC Voltage from the solar inverter with a 4kVA "tool transformer".  It outputs 110V AC from the 230V AC input.  This runs the 3kW heater element at just 650W.
Under software control from the PC load manager, the first relay turns the heater on and off, while a new second relay selects the power level of the heater, depending on the solar power available.

I added a pair of 6A diodes in parallel (for power handling, as the peak current when the heater is on is about 8.4A).  This converts the 110V AC into half-wave rectified DC.  The diodes are rated at 600V so they are pretty bullet proof.  This has the effect of reducing the power consumption of the heater from 650W to just 350W; measured with an AC plug-in power meter at the 230V AC input to the transformer.

The thermostat switch on the heater ordinarily wouldn't like DC power, as it would cause arcing when the contacts open, and this would soon destroy the thermostat.  But as this is half-wave DC, it still has the periods of zero Voltage in each 50Hz cycle, so the thermostat contacts can open and close as normal without arcing.

I then had to modify the control software to take advantage of the new dual power heater.

I decided to ditch the purely light level & system power level threshold system, for one that attempts to estimate the array power available for driving the heater loads (at two power levels).

Click to view bigger

It has a seed value that is the expected array power (the "system size").  It then applies a self tuning modifier to that base value (plus/minus 200W) and then multiplies that by the measured light strength from the new sensor (as a percentage).  This gives me the estimated "array power".  The "system power" is the real measured output power from the Morningstar charge controller log data.  This includes all loads: battery charge load, other loads (e.g. the fridge), as well as the heater load (if it happens to be on).

By comparing the real power output during times when the battery is likely to be fully loading the array with the estimated "array power", the self tuning parameter adjusts the estimate up or down, so that the estimate gets better.  It has some limits set in the routine, so that it does not tune the estimate at very low light levels that would never be enough to drive the heater load.  It also has some fuzziness in the tuning so that if it is within 1% of the real power, it stops hunting.  If the tuning parameter gets bigger than 200W variance, it starts to modify the base assumption about the "system size", saving the change in a config file for next time the program runs.

Most of the estimate tuning happens in the MPPT bulk charge phase, as that is when the battery will absorb all the power the array can muster, and so the "system power" should equal the estimated "array power".  The idea is that the tuning parameter will compensate for the distributed orientation of the panels (some are East-West, some are South, some are at steep angles, some at shallow angles).  The system will also "learn" how dirty the array is (if there has been no rain for a while, and dust has collected on the panels).

The final step is that when the battery enters the absorption phase, the program looks at the estimated array power and subtracts the current "system power", which includes all non-heater loads plus charge demand, and calculates the "available power" for running the heater load.  If the "available power" is greater than the low (350W) heater setting, but less than the high (650W) heater setting, it turns the heater on, and selects "low power" mode (the diode bypass relay is energised and the normally closed contacts change to be open).  If the "available power" is higher than the high power setting, the diode bypass relay is de-energised, the contacts revert to the normally closed position, and the heater receives the full 110 V AC power.

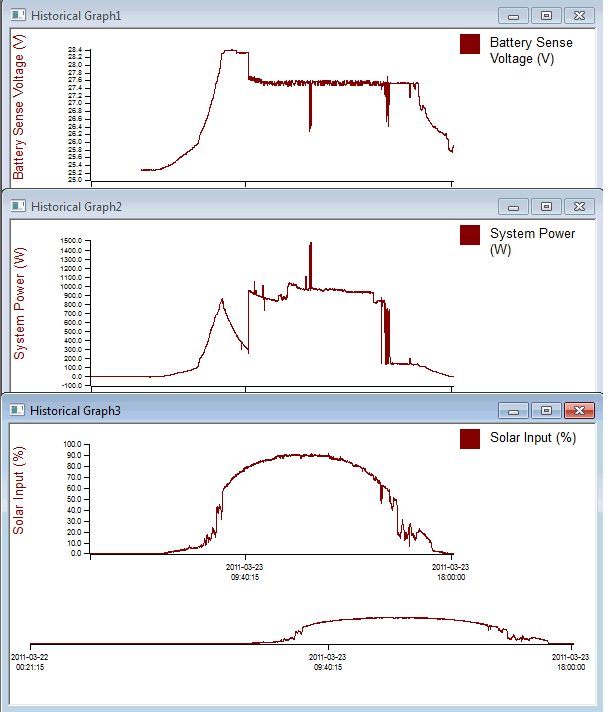
The resulting power utilisation is more even, with the heater able to use low levels of available power and maintain the tank temperature. 350W is enough to very slowly heat the water, or at least compensate for losses through the insulation.  It all helps.  When it's sunny enough, and the other loads are low enough, the heater can run at full power (650W).

Click to view bigger
The above trace also shows the water heater interacting with the cyclic load of the fridge freezer.  While the recorded system power varies considerably, note that the battery is given priority in attaining full charge and holding a steady float Voltage for as long as possible.

During the absorption and float stages of battery charge, the heater decision process also includes some "array power" estimate tuning.  If the heater repeatedly has to reduce power to low power, the tuning parameter slowly drifts downwards.  If the heater has to be shut off due to low power, the parameter decreases more quickly.  As a last resort, if the battery Voltage actually drops below the float threshold set in the load controller, then a much more severe adjustment of the parameter occurs.  This behaviour means that on clear sunny days, the heater is given priority and has a tendency to stay on.  On days with very changeable weather, the heater progressively errs on the side of caution, becoming less and less likely to turn on and more likely to turn off or remain in low power mode.  This favours maintaining the battery charge level.

Use of a half-wave rectifier at high power (350W is a significant load) is normally frowned upon, as it presents a very non-linear AC power load (only half the cycle is used).  The plug-in AC meter did show a very bad power factor (PF = 0.5).  This would result in power being wasted in the wiring and generator as reactive power (current out of phase with the Voltage).  But the 3kW inverter is stable into any power factor load (inductive or capacitive), and in the end, the source of the power is a DC battery or solar panel.  With the very large capacitors in the inverter input (for surge delivery), the DC source is not aware of the non-linear AC load, and merely sees a useful reduction in load.  The "bad" AC load does consume more of the available VA capacity of the inverter than a good power factor load would, but provided the total VA load is less than the permissible load, no harm is done.

Wednesday, March 23, 2011

New Solar Sensor (again...)

Lately, the tupperware solar sensor that is supposed to measure the available solar power to control my solar water heater has been playing up. Sometimes reading zero in full sunlight or other wonky values that didn't seem right. It also was too directionally sensitive - a feature of the old solar panel used that has micro lenses on it that focus the light - but only when it shines square on to the panel. Also the box itself was possibly causing some shading or variation in light getting through. On closer inspection, the UV had destroyed the tupperware, making it crack and go brittle.

So the search was on for a small sensor that will be weather proof and less directionally sensitive. The local Robert Dyas had the perfect bit of bodgineering raw material... a £1.49 solar garden path LED lantern spike thingy.
It had a little amorphous solar panel on the top and all the bits came apart easily to leave the plastic and stainless steel capsule on its own. I could just rip out the little circuit board with the LED and battery, and connect the wires from the solar panel across a 100 Ohm resistor load in a chocblock (so that the device measures solar power). Then I just had to hot glue up the holes on the base to prevent water getting in. The hole where the LED came out was just the size to fill with a rubber blanking grommet.

Some of the existing holes, that were used for the clear lantern bit to snap on to, were also handy for threading the plastic cable tie through. I mounted the new capsule sensor on a handy hanging basket bracket that was already on the wall when we moved into the house. This, by sheer coincidence, is at the same angle as the main solar panels.
The amorphous panel has no outer window or lens to restrict the angle of light acceptance and amorphous panels are less sensitive to direction anyway, so it seems to give a good reading through the day.

The output Voltage was a little lower than the old sensor, so I had to recalibrate the measuring software on the load controller to get a proper 100% reading in full sunlight. In the end, I decided it would be easier to modify the software to have a user parameter for the sensor scaling, avoiding the need for recompiling the program just to change the value. Amorphous panels put out up to 20% more power when new, but quickly settle down to their usual power when exposed to the sun for a few weeks, so it made sense to change the software to allow tuning the sensor. I even added new today and yesterday counters for the heater run time and estimated kWh of DC power generated.
I've even got the (still working) white LED, solar controller chip, NiMH coin cell and on/off switch gubbins that I can play with. Most of that would be worth at least £2-3 if I'd bought it from Maplins. So the solar panel was actually "free".

Oh, yeah... Like my new multimeter? It's an antique Micronta (Tandy) analogue (but with FET inputs) 1980's test meter that I picked up at a car boot the other week. Nowhere as accurate or convenient as a DMM but looks "retro-cool".
The new sensor has been working better than I expected, and now the water heater works really well.  Getting good heating yields but not cycling the battery much at all.

Here you can see the results of a totally blue sky day on the right of the graphs...  Even on the not so good day, the battery Voltage holds up pretty well with the more accurate solar power availability estimate. Click on the chart below to see it in full size.
Today's trace (on the right) was the first full solar hot water day of the year. You can just see there were no clouds at all by the totally smooth sensor trace.  No gas used today, and 48'C water in the tank :D.